- Try running Excel in safe mode to check if one of the add-ins is causing problems.
- If you are experiencing this issue with a specific spreadsheet, remove any conditional formatting from it.
- Running Microsoft’s Office repair tool is an effective way to fix such issues with Excel on Windows.
Fix 1: Open Microsoft Excel in Safe Mode and Disable Add-Ins
You can open Excel in Safe Mode to run the app without add-ins. This will help you verify if one of the installed plugins causes the issue. Press the Windows key + R to open the Run dialog. Type excel -safe in the box and press Enter .
Try using Excel in safe mode to see if it works fine. If it does, one of the third-party add-ins might be why Excel is not responding on Windows 11. You can disable all add-ins and re-enable them individually to isolate the culprit.
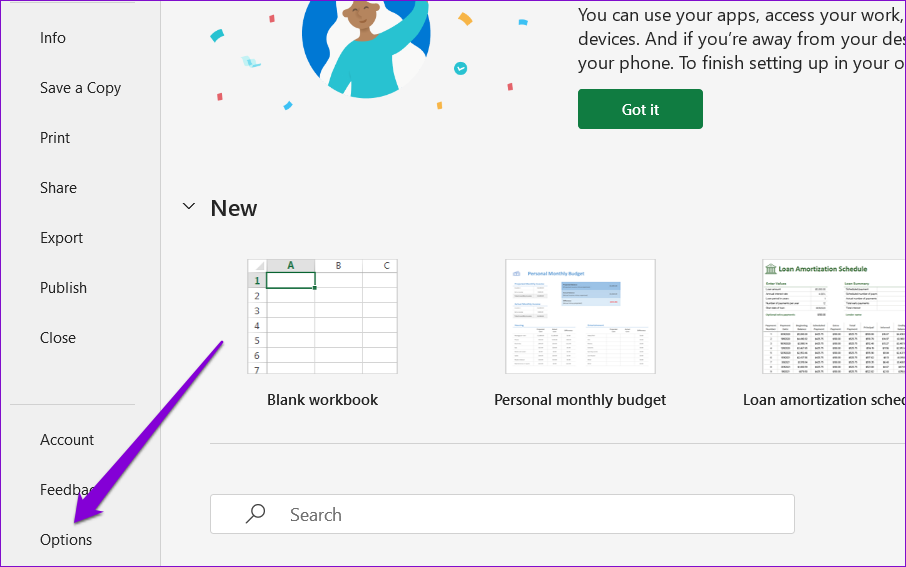
Step 1: Open Excel and click the File menu in the top left corner.

Step 2: Click Options in the bottom-left corner.
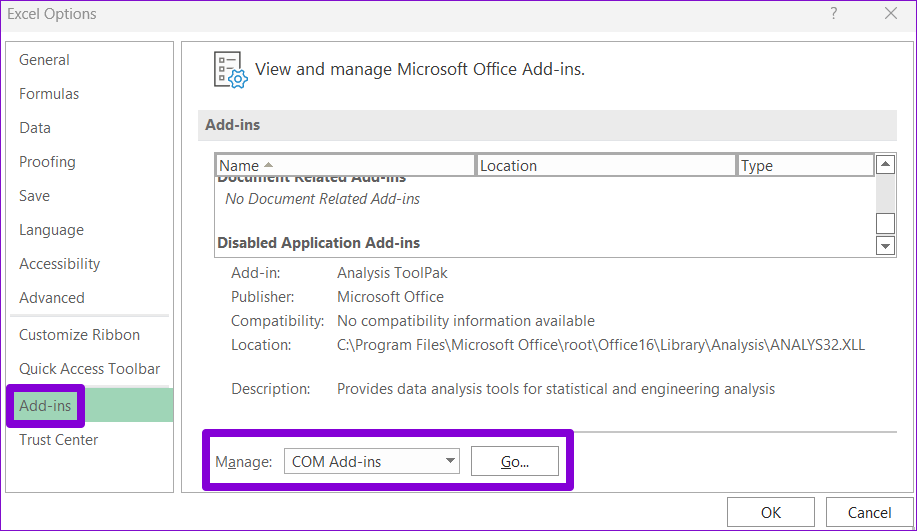
Step 3: In the Excel Options window, navigate to the Add-ins tab. Then, select COM Add-ins in the Manage drop-down menu and click the Go button.
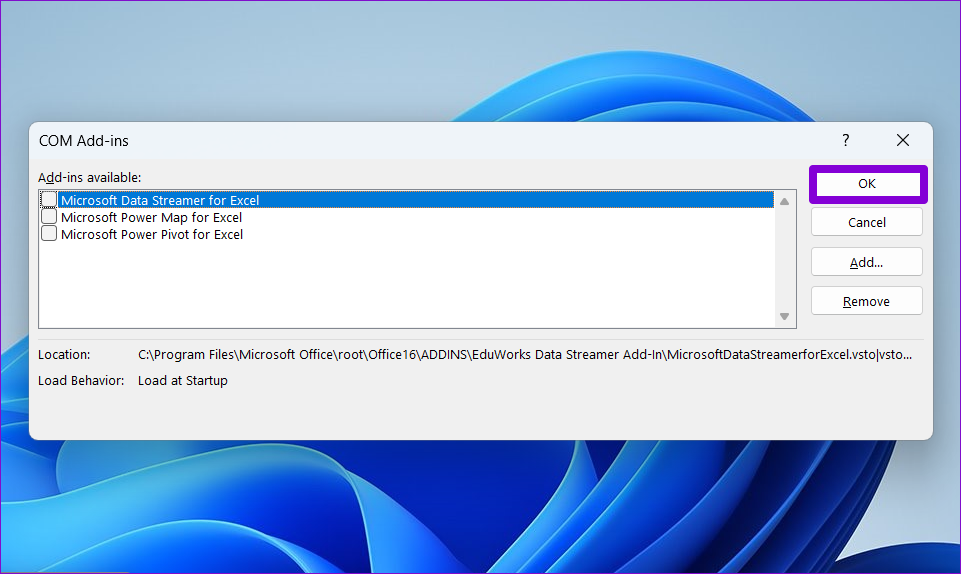
Step 4: Uncheck all the Add-ins and click OK .
Restart Excel after this and enable your add-ins one at a time. Observe Excel’s performance after enabling each add-in to identify the one causing the issue.
Fix 2: Clear Conditional Formatting
Excel might encounter problems opening specific spreadsheet files with peculiar formatting. If the issue only occurs when you try to access a particular spreadsheet, try temporarily disabling conditional formatting for that sheet.
Step 1: Open the problematic Excel file and switch to the Home tab.

Step 2: Click the Conditional Formatting option, go to Clear Rules , and select Clear Rules From Entire Sheet from the sub-menu. Repeat this step to clear conditional formatting for all the sheets in your file.

Step 3: Press F12 to open the Save As dialog and save your Excel file with a new name.

Fix 3: Change the Default Printer
Whenever you open a spreadsheet in Excel, the app communicates with your PC’s default printer to determine supported margins. Excel may fail to connect to the default printer if it is not working correctly . In such cases, selecting another printer as the default printer should fix the issue.
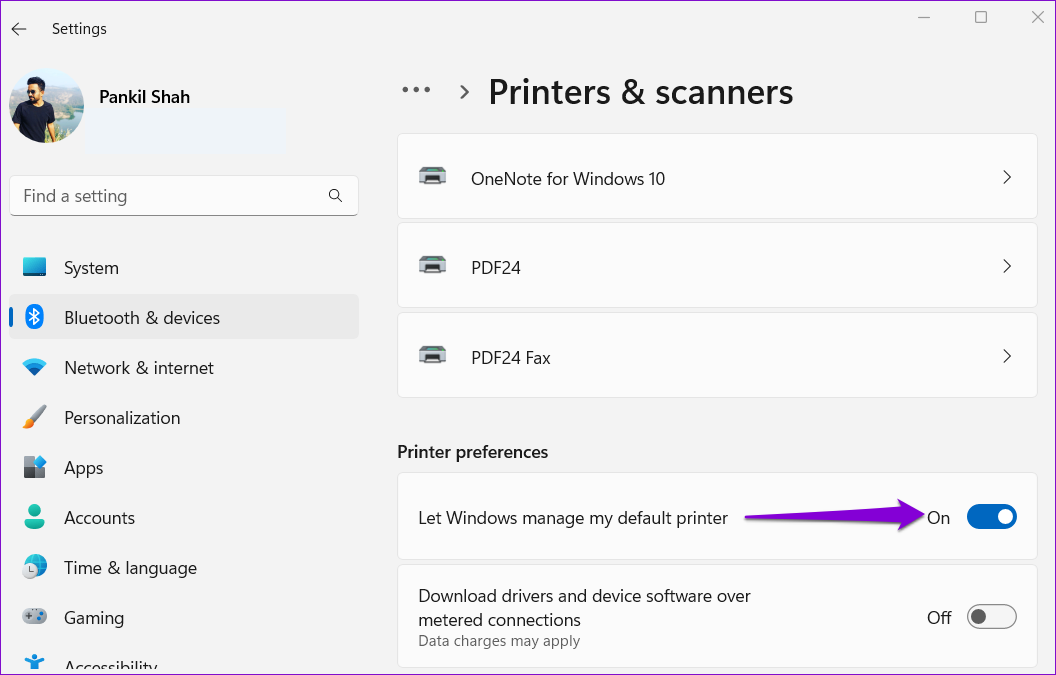
Step 1: Press the Windows key + I to launch the Settings app and go to Bluetooth & devices > Printers & scanners .

Step 2: Under Printer preferences, toggle off the switch next to Allow Windows to manage my default printer .
Step 3: Select a working printer from the list and click the Set as default button.

Fix 4: Repair Microsoft Office
Microsoft Office offers a handy repair tool that you can use when Office apps such as Word or Excel aren’t working correctly . Here’s how to run it.
Step 1: Right-click on the Start icon and select Installed apps from the list.

Step 2: Scroll down to locate the Microsoft Office product on the list. Click the three-dot menu icon next to it and select Modify .

Step 3: Select Online Repair and hit Repair .

Was this helpful?
- Set the connected printer as default from Windows Settings > Bluetooth & devices > Printers & scanners > Set as default, and retry printing your file.
- Rollback the recently installed Windows Update from Settings > Windows Update > Update history > Uninstall updates.
Basic Fixes
- Reconnect printer : If you’re using a wired printer, its loose USB connection to your PC may result in ‘Printer not activated (Error Code 30)’. Replug the printer and replace its cable if it is worn out.
- Update the USB drivers : Obsolete USB drivers can create printer connectivity issues. Head to the Device Manager app, expand ‘Universal Serial Bus controllers’, right-click the buggy USB port, and select Update driver.
- Use the HP Smart app to connect the printer : If your Windows 11 PC doesn’t detect your HP printer , install the HP Smart app from the Microsoft Store, and use it to configure printer settings.
- Update Windows : Press the Windows + I shortcut to open Settings, select Windows Update from the left sidebar, and install available system updates.
Fix 1: Set the Connected Printer as Default
If your preferred printer isn’t set as default, you may run into the ‘Printer not activated, error code-30’ issue on Windows. Ensure your printer has adequate paper and ink and use the following steps to set it as a default printer:
Step 1: Open Windows Settings using the Windows + I shortcut, select Bluetooth & devices from the left sidebar, and click Printers & scanners .

Step 2: Select your preferred office or home printer.

Step 3: Ensure the Printer status isn’t Offline and click Set as default to assign it as a default printer for all printing operations.
Tip: If the Printer status is labeled ‘Offline’, check its power source and try reconnecting it to your PC.

Fix 2: Reinstall Printer Drivers
Corrupt printer drivers can cause unusual printing errors. To fix this, first remove the printer from Windows Settings > Bluetooth & devices > Printers & scanners, and re-plug the printer. Then, reinstall the printer drivers using the Device Manager app to restore normalcy.
Step 1: Press the Windows + X shortcut to open the Power User Menu, and select Device Manager .

Step 2: Expand Software devices , right-click your printer, and select Uninstall device . Restart your PC and let Windows 11 automatically install compatible printer drivers.

Fix 3: Run the Printer Troubleshooter
Do you still face the ‘Printer not activated (Error Code 30)’ message while printing a PDF on Windows 11? Running the in-built printer troubleshooter should fix it in no time.
Step 1: Select Printers & scanners under Windows settings (check the above steps), and click your connected printer.

Step 2: Select Run the troubleshooter and wait a few seconds to let it resolve the issue.

Fix 4: Tweak Permission Settings on a Program
If you face the ‘Printer not activated, error code-30’ in a specific app, give it full control over your PC to print files and documents seamlessly.
Step 1: Right-click the app icon and select Show more options .

Step 2: Select Properties from the right-click context menu to open it.

Step 3: Open the Security tab and click Edit .

Step 4: Enable the Allow checkmark beside Full control and click Apply followed by OK to save changes.

Fix 5: Rollback the Recent Windows Update
Lastly, a buggy Windows Update can malfunction your connected printer showing the ‘Printer not activated (Error Code 30)’ message while initiating a new print. To fix it, rollback the recent Windows Update using these easy steps:
Step 1: Press the Windows key, search Uninstall updates , and click it to open the system settings.
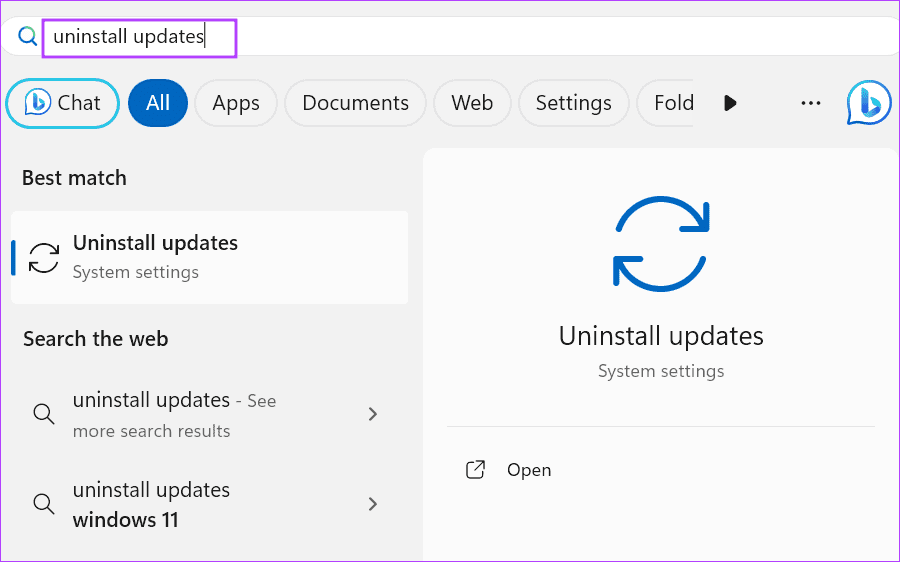
Step 2: Locate the recently installed Windows Update using the ‘Installed on’ timestamp, and click Uninstall to remove it. Select Uninstall when prompted to confirm the action.

Was this helpful?
- Outlook saves its print settings in the Outlprnt file. Deleting the file can help fix print issues.
- Sometimes, Outlook plugins and extensions can interfere with the printing. Removing them can help you fix the issue.
- Ensure the email is completely downloaded before you can print it.
Try Basic Fixes:
- Restart Outlook: When Outlook relaunches, it loads all the modules, including extensions. This ensures that if Outlook or any of its modules are stuck, they will start working.
- Reset hardware connection : Powering off a printer might clear temporary issues, such as a print job stuck in the queue or a minor error.
- Update the Outlook app: If the Outlook app and Windows settings are out of sync, especially after a Windows update, check if an update is available for the app.
Fix 1. Check the Default Printer
Sometimes, we select a printer and wait to realize it isn’t the default printer. Windows Settings can quickly fix this, or you can manually select the printer whenever you print.
Step 1: Press Windows + I to open Settings.
Step 2: Select Bluetooth & devices from the sidebar. Select Printers & scanners from the right pane.

Step 3: Find the connected printer from the list and click on it.

Step 4: Select the Set as default button from the following menu. Open Outlook and try to print the attachment again.

Fix 2. Save the Document and Print It From File Manager
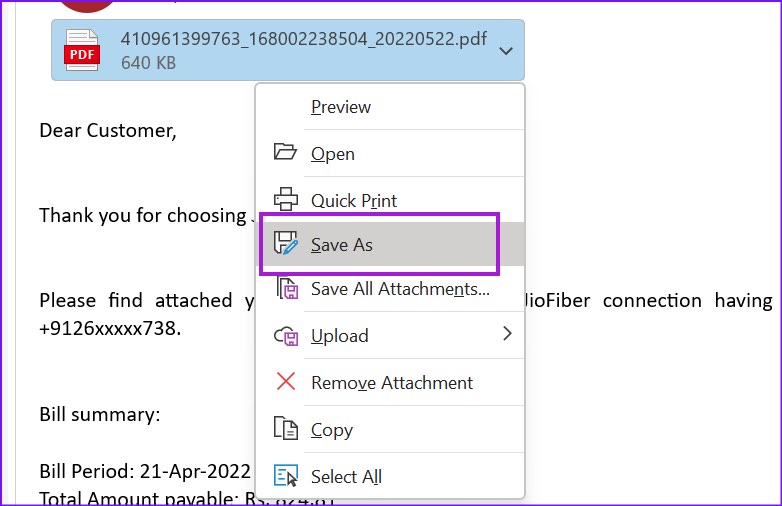
If Outlook still gives you trouble printing an attachment, you can save the document locally on the PC and print it.
Step 1: Download the attachment from Outlook or choose the Save as option, and save it on your PC.
Step 2: Use the File Manager to find the document and double-click to launch it in the Microsoft Edge browser or any PDF app.

Step 3: Look for a printer icon and use it to print the document.
Fix 3. Run Printer Troubleshooter
A built-in Windows troubleshooter can reset some printer parameters, which can help you start printing again.
Step 1: Open the GetHelp App using the Start menu.
Step 2: Type printer troubleshooting in the text box, showing you the Printer troubleshooter .

Step 3: Launch the wizard and let it complete the process. Once done, open the Outlook app again and try printing a document.
Fix 4. Uninstall Printer Drivers
At times, corrupt or outdated printer drivers can lead to such issues. You can reinstall printer drivers and try your luck again.
Step 1: Right-click the Windows key and open the Device Manager from the menu.

Step 2: Scroll down and expand the Print queues listing.
Step 3: Right-click on the printer with which you have the issue and select Uninstall device from the context menu. This will also Uninstall the driver.
Alternatively, follow this guide to remove the printer and uninstall the driver .

Step 4. Confirm your decision and restart the PC. Once you log into your account, Windows will install the default driver for the driver. Check if you can print from Outlook.
Fix 5. Wait for Emails to Download Completely
If an email contains too many elements, such as images from external sources or linked documents, and you start printing as soon as it arrives, it might cause an issue.
It’s best to wait for the download to complete; you can see no broken images, etc. For such emails, it’s best to wait for the download to be complete and then print it.
Fix 6. Troubleshoot Outlook Com-Addins And Extensions
Some Com-Addins and extensions can interfere with the print experience. It would be best to remove and disable them and troubleshoot.
Step 1: Open the Run prompt using Win + R, type Outlook /safe , and press Enter .
Step 2: Once Outlook launches, check if you can print. If it works, check which extension is causing the problem.
Step 3: Launch Outlook the usual way > go to File > Options > click on Add-ins .

Step 4: Click the Go button next to COM Add-ins to open a list of installed Addons and extensions .

Step 5: Select the one to uninstall from the checked list and click the Remove button. Once you’ve done this, try to print. Repeat the steps until you find the one causing the issue.
Fix 7. Delete the OutlPrnt file (Print Settings)
The OutlPrnt file stores printer settings. If the file becomes corrupt, the print function will not work as intended. However, if you delete the file, it will be recreated.
Step 1: Go to %AppData%/Microsoft/Outlook using the Run prompt.
Step 2 : Locate the OutlPrnt file and permanently delete it.
Step 3: Relaunch Outlook and check if you can print a file.
