- Open the Settings app by pressing the Windows + I key shortcut.
- Press the Windows + R shortcut to open the Run window > type ms-settings: > hit Enter.
Method 1: Utilize the Power User Menu
The Power User Menu contains shortcuts to all important applications including the Settings app. Press the Windows + X keys simultaneously to access the Power User Menu and click Settings to open it.

Method 2: Open the Settings App via the Windows Search Menu
The Windows Search Menu is a one-stop solution to access all apps and installed programs on Windows 11. Press the Windows key , search Settings in the search bar, and press Enter to open it.

Method 3: Use the Action Center
The Windows Action Center is your central hub for notifications and essential controls, such as Bluetooth, Wi-Fi, and Accessibility.
To open the Settings app via Action Center, press the Windows + A keys and click the Gear icon at the bottom right corner.

Method 4: Use Task Manager to Open Windows Settings
In addition to the Action Center, you can manually create a new task in the Task Manager to quickly open the Settings app.
Step 1: Press the Ctrl + Shift + Esc keys to open Task Manager and click Run new task at the top right.
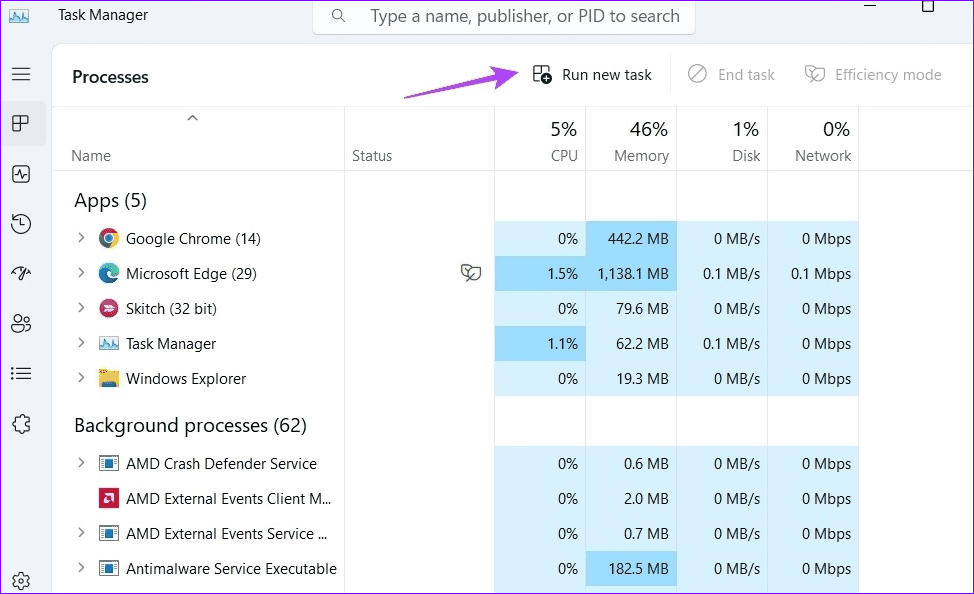
Step 2: Type ms-settings: in the search bar and hit Enter to open the Settings app.

Method 5: Open the Settings App via Command-Line Tools
Lastly, you can open the Windows 11 Settings app by executing a command on Command Prompt or Windows PowerShell.
Step 1: Press the Windows key , search Command Prompt , and click to open it. Alternatively, search Windows PowerShell to launch it.

Step 2: Type start ms-settings: in the window and hit Enter .

Useful Trick: Pin the Settings App to the Taskbar
If you don’t wish to execute commands, pin the Settings app shortcut directly to the taskbar to open it anytime.
Press the Windows + I keys to open the Settings app, right-click its Gear icon in the taskbar, and select Pin to taskbar .

Was this helpful?
- Windows 11 provides several handy tools for dealing with its inability to recognize your printer, including troubleshooters and driver update mechanisms.
- Always try restarting your printer and your Windows device, in addition to checking your printer cables, before trying these fixes.
- Restarting your print spooler can be a good fix if troubleshooting doesn’t work.
It can be super annoying when your printer randomly decides to up and stop working in Windows 11. Nothing seems to be fixing the issue. You’ve restarted the printer and checked all the cables, but you still have the same problem – Windows 11 not recognizing printer availability. Let’s sort that problem out with a few fixes you might not have tried yet.
Fix 1 – Troubleshooting Your Printer
Sometimes, Windows 11 itself can tell you what’s wrong, even if it does bury its ability to do so in a troubleshooter that isn’t obvious to access. Follow these steps to find (and use) a printer-specific troubleshoot.
Step 1 : Open the “Settings” menu by typing “Settings” into your Windows search bar and clicking the appropriate icon.

Step 2 : Head to “System” and click the “Troubleshoot” option. You’ll find it about two-thirds of the way down the list.

Step 3 : Choose “Other Troubleshooters” from the list.

Step 4 : Find “Printer” in the list (it should be near the top) and click the “Run” button. Windows 11 will take some time to troubleshoot and lets you know if there are any device issues you need to fix to get your printer up and running again.
Fix 2 – Restart the Print Spooler
Windows 11’s print spooler handles every aspect of how the operating system communicates with your printer. That can be a problem – spooler corruption or even just accidentally turning it off means that Windows won’t recognize any printer you try to use. Check the spooler with these steps.
Step 1 : Press “Windows Key + R” to open the “Run” dialog box and type “services.msc” before hitting the “OK” button.

Step 2 : Double-click the “Print Spooler” option in the list, which is usually a little beyond halfway down.

Step 3 : Select “Stop” to prevent the print spooler from running anymore and hit the “OK” button.

Step 4 : Open your “This PC” folder and follow this path to reach the print spool folder:
C:\Windows\system32\spoolsv.exe
Once there, delete every single file you see in that folder.
Step 5 : Retrace Steps 1 through 3, with the only difference being that you hit the “Start” button instead of “Stop.” Click “OK” again and restart your PC. The restarting process should cause Windows 11 to recreate its print spool, getting rid of any corruption that cause it not to recognize your printer before.

Fix 3 – Update Your Printer’s Drivers
A missed driver update could cause conflicts between Windows 11 and your printer, which you can fix with these steps:
Step 1 : Right-click the “Start” button in the Windows toolbar and select “Device Manager.”

Step 2 : Click the little arrow next to “Print Queues” to expand the category.

Step 3 : Right-click on “Microsoft Print to PDF” and choose “Update Driver” from the list of options in the menu.

Step 4 : Choose the “Search automatically for drivers” option and wait for a while. Windows 11 will run some online searches to see if there are any missing drivers your printer needs and install them. If none are found, it’ll tell you that the most up-to-date drivers are already installed, meaning there’s another problem causing your printer woes.

